Audiovox UV8035 Manuel du propriétaire
Naviguer en ligne ou télécharger Manuel du propriétaire pour Systèmes vidéo pour voitures Audiovox UV8035. Audiovox UV8035 Owner`s manual Manuel d'utilisatio
- Page / 26
- Table des matières
- MARQUE LIVRES
- Owner's Manual 1
- PREPARATION 2
- INSTALLATION INSTRUCTIONS 3
- Dashboard 4
- Removal Key 4
- DIN Rear Mount (Method B) 5
- Reconnect Battery 5
- Rear Line out 6
- DETACHABLE CONTROL PANEL 7
- REMOTE CONTROL 8
- (CR2025) 9
- OPERATING INSTRUCTIONS 10
- Display Selector (D) 11
- System Menu (D/MENU) 11
- Audio Menu Button 12
- Subwoofer (SUB-W) 13
- Bass Boost (iX-BASS) 14
- AM/FM Band Selector (BAND) 15
- CD/DVD OPERATION 16
- Direct Track Access (GOTO) 17
- VCD PlayBack Control (PBC) 18
- DVD Playback Features 18
- JPEG CD Operation 18
- MEMORY CARD OPERATION 19
- DUAL ZONE OPERATION 20
- SYSTEM SETUP MENU 21
- CARE AND MAINTENANCE 23
- SPECIFICATIONS 24
Résumé du contenu
UV8035UV8035Owner's ManualMultimedia Receiver
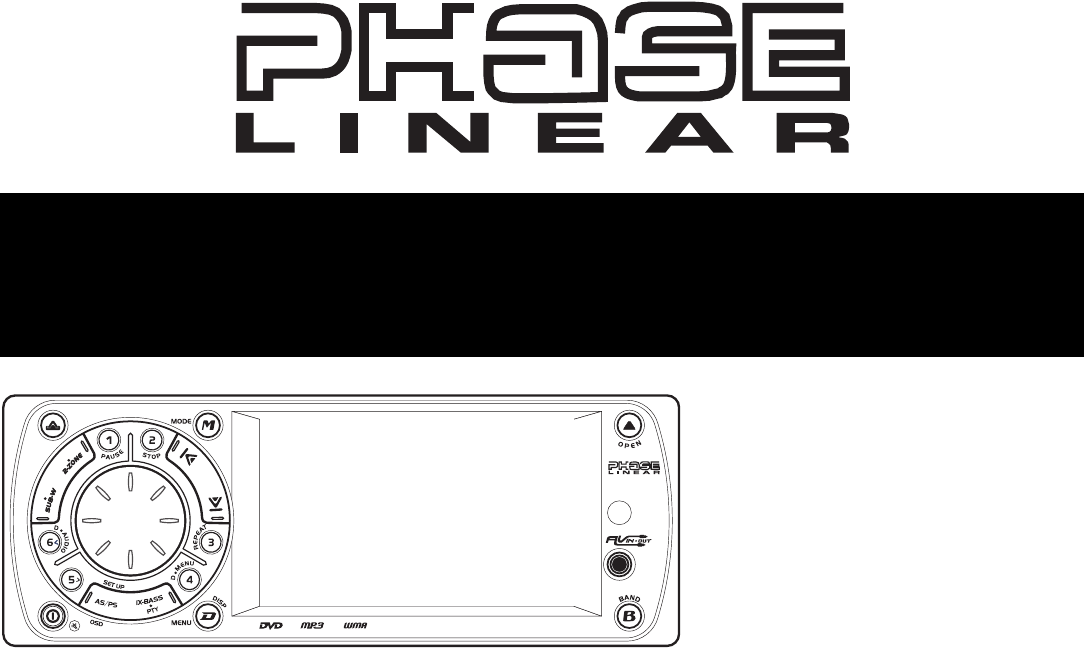
UV803510OPERATING INSTRUCTIONSPower On/OffPress and hold the (power/mute) button (1) or short press any other button on the control panel (except op
UV803511Display Selector (D)You can change the way playback information is displayed to suit your needs. Press the D/DISP button (7) to alternate betw
UV803512ClockTurn the rotary encoder (4) to the right to adjust the minutes or to the left to adjust the hour.Time FormTurn the rotary encoder to adju
UV803513• LEVELTurn the rotary encoder clockwise to increase or counter-clockwise to decrease the Mid-Range level from “-6” to “+6”. “00” represents a
UV803514encoder to access and modify the following options:• Level: Turn the rotary encoder to adjust the subwoofer Level from “00” to “12”.• LPF: Tu
UV803515TUNER OPERATIONAM/FM Band Selector (BAND)Press the B/BAND button (20) to change between three FM and two AM bands. Each band stores up to six
UV803516CD/DVD OPERATIONInsert Disc (OPEN)Press the OPEN button (8) to open the front panel and reveal the disc slot. With the label surface facing up
UV803517Track SelectionThe Track Select functions are used to quickly access the beginning of a track/chapter. Each time the track up (|||<) button
UV803518VCD PlayBack Control (PBC)If you insert a VCD with playback control (version 2.0), playback automatically starts at the beginning of the first
UV803519MEMORY CARD OPERATIONThis unit can play MP3, WMA, JPEG and MP4 files stored on an SD or MMC Memory card.Inserting an SD or MMC Card1. Detach
UV80352PREPARATIONGetting StartedIt’s a good idea to read all of the instructions before beginning the installation.ContentsPreparation...
UV803520DUAL ZONE OPERATIONThis unit is equipped with an advanced Dual AV Zone feature, which allows the user to select different modes of Audio and V
UV803521SYSTEM SETUP MENU1. During DVD or CD playback, press and hold the AS/PS button (15) to access the System Setup Menu. 2. Use the tune/track |||
UV803522VideoTV Aspect Ratio (video)Select the appropriate aspect ratio for your TV.• 4:3: Aspect ratio of TV is 4:3.• 16:9: Aspect ratio of TV is 16:
UV803523CARE AND MAINTENANCEYour new radio/CD/DVD player does not require any maintenance. However, proper understanding of its use and handling will
UV803524SPECIFICATIONSCD-R and CD-RW CapabilityDepending on media type and method of "recording / burning", some DVD's, SVCD's, VC
Limited Warranty DO NOT RETURN THIS PRODUCT TO THE STORE CD or Multimedia Radios/Headunits Audiovox Electronics Corporation (“the Company”) is com
Audiovox Electronics Corporation150 Marcus BoulevardHauppauge, NY 117881-800-323-4815www.audiovox.com©2007 Audiovoxv.090307
UV80353INSTALLATION INSTRUCTIONSBefore You Begin1. Disconnect battery negative terminal.2. Remove transport screws.Important Notes• Before final insta
UV80354position it. CAUTION: The rear of the radio must be supported with the strap to prevent damage to the dashboard from the weight of the radio or
UV80355DIN Rear Mount (Method B)This unit has threaded holes in the chassis side panels which may be used with the original factory mounting brackets
UV80356WIRINGWARNING! Never combine (bridge) outputs for use with 1 speaker.WARNING! Never ground negative speaker leads to chassis ground.CAUTION: Fa
UV80357DETACHABLE CONTROL PANEL• DO NOT insert the control panel from the left side. Doing so may damage it.• Do not put pressure on the display or co
UV80358REMOTE CONTROLThe remote control will allow you to control the advanced functions of the UV8035.1. MUTE/Power2. Open/Close/Eject3. Audio Menu4.
UV8035929. Press repeatedly to select a number in the tens position for direct track entry (for example, to select track “44”, press the +10 button fo
Produits connexes et manuels pour Systèmes vidéo pour voitures Audiovox UV8035
 (48 pages)
(14 pages)
(48 pages)
(14 pages)
 (54 pages)
 (3 pages)
 (22 pages)
© 2020, manymanuals.fr. Tous droits réservés | 4.666 s |
 Manymanuals.com
 Manymanuals.de
 Manymanuals.fr
 Manymanuals.it
 Manymanuals.pl
 Manymanuals.cz
 Manymanuals.es
 Manymanuals-pt.com
Commentaires sur ces manuels